Imagine you have a website but know nothing about SEO. But you’ve heard about Yoast SEO and people have told you it’s a great tool for effortlessly optimizing your site and its pages for Google, Bing, and Yandex. So you install the Yoast SEO plugin or the Yoast SEO extension and follow the instructions. What’s next? While it’s unlikely that your website will be right at the top of Google within a week, our plugin helps you to optimize for search engines, to improve your chances to rank. It does that well, but it still needs your input.
This beginner’s guide to Yoast SEO explains the basics of SEO as covered by our plugin. Let’s go through the steps every user should take when trying the Yoast plugin, and take the first steps in optimizing your site.
Do you need more guidance, to use all the great features of Yoast SEO to their full potential? Look no further and check out our free Yoast SEO for WordPress plugin training! It’ll teach you how to make optimum use of your Yoast SEO plugin, so you can take your SEO to the next level!
A beginner‘s guide to Yoast SEO
Before we start, take note that this isn’t a guide to every single detail of our plugin. In this post, we’ll show you some important things we think you should use or configure. Our plugin has quite a few settings, so it’s good to know which you should configure first. If you have a site-specific question about a particular setting in the plugin, you could also check out the Yoast Knowledge Base.
In this post, we’ll cover:
- Configuring Yoast SEO: configuration wizard
- Using the Yoast SEO metabox
- A bit more advanced: Yoast Dashboard
Configuring Yoast SEO: configuration wizard
Our Yoast SEO configuration wizard is a great place to start configuring your plugin. You’ll find it at Yoast SEO > General > Dashboard:
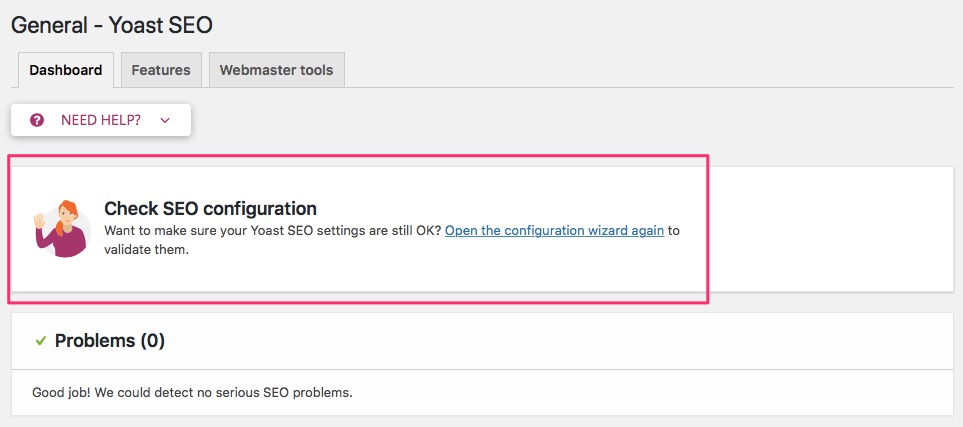
The configuration wizard guides you through several steps that help you configure our plugin to suit the needs of your site. Even if your website has already been around for a while, you can still run the wizard every now and then. Just to make sure your settings are up to date. Each step of the wizard includes questions, the answers to which will determine particular settings.
Read more: The Yoast SEO configuration wizard and why you should use it »
Other settings
Of course, there are many aspects to SEO, and many more settings you could tweak in the plugin. But we set the configuration wizard in such a way that it already configures the plugin’s general settings correctly for your website. So you can focus on what’s most important – your content! Curious to find out what the plugin does for your site? Read up on Yoast SEO’s hidden features that secretly level up your SEO!
Using the Yoast SEO metabox
Of course, any Beginner’s guide to Yoast SEO should extensively cover the metabox. The Yoast SEO metabox will help you optimize your content as you’re writing it in the backend. If you’re using the Block Editor, you’ll find the it on the right side of the editor, as well as underneath the editor. Here, you’ll find a few tabs, two of which we’ll discuss here.
- A tab where you can insert the word or phrase you want to optimize the page for – the focus keyphrase. This tab also includes the SEO analysis.
- A tab for the readability analysis. The checks in this tab help you write the best copy you can, so you can serve your audience great content.
Let’s go through the checks in each tab, and explore which other things you can set in the metabox.
The readability analysis
The first step in optimizing your post or page is making sure it’s nice to read for your audience. Since SEO is one of those areas where content is indeed king, we provide a convenient readability analysis for you. That’s because we understand not everyone has the skills to easily create readable content. Use the readability analysis when you’re writing a new post, or directly after, depending on what works best for you.
Now let’s see what’s in our readability analysis:
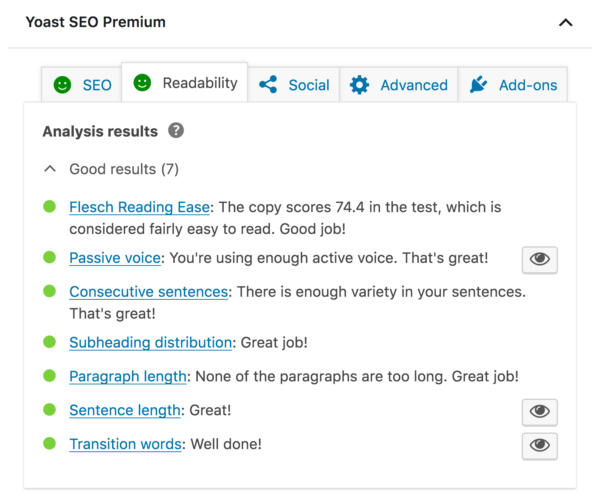
As you can see, we analyse many different aspects of your text:
- Readability score: the Flesch Reading Ease test makes sure every reader can understand your writing. If you are writing for a more educated audience, a lower score is acceptable – it’s a guideline, you decide how strictly to follow it.
- Use of passive voice: passive voice distances you from the reader, while active voice is much more engaging. It’s almost impossible to write a ‘natural’ article without any passive voice at all, which is why we ‘allow’ 10% passive voice in our analysis.
- Consecutive sentences: if your text contains three or more sentences in a row all starting with the same word, it may become a bit repetitive. We encourage you to mix things up!
- Use of headings and subheadings: Headings help you group topics, which makes a text easier to process, which means that people can scan your pages faster.
- Paragraph length: long paragraphs in an online article are more difficult to understand as readers find themselves lost in all the words. Bite-sized chunks of text are easier to process.
- Sentence length: while in a book you can stretch a sentence over half a page, shorter sentences are much easier to read online. We use 20 words as a target length.
- Use of transition words to help improve the ‘flow’ of your page. They send a signal to your visitors that something is coming up and prepares them for the next sentence. You’ll find that the recommendation of using transition words in 30% of your sentences isn’t that hard to do.
If you want more insight into how we decided on all these criteria, see Content analysis: methodological choices explained. By the way, our readability analysis works for many languages, such as English, Spanish, Dutch, French, German, and Italian. Here’s an overview of which features are available per language.
Snippet preview
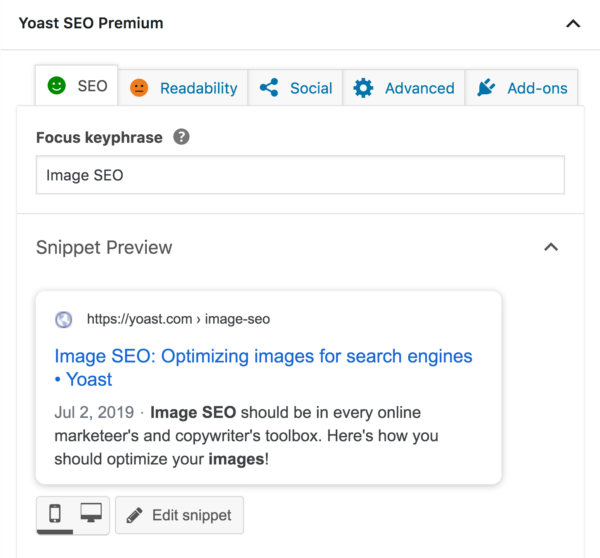
In addition to the checks in the metabox, we provide an editable snippet preview. In the Block Editor, you can find it near the top of the sidebar, or underneath the editor, under the ‘SEO’ tab. The snippet preview shows you how the Yoast plugin displays your page to Google and other search engines. In other words, it gives an idea of how your site would appear in the search results.
In the snippet preview, you can set a meta description. Make an effort and write a meta description that clearly reflect what your post or page is about. Let people know they’ll find what they’re looking for on your site and entice them to visit your site. There’s no guarantee that Google will display your meta description in the results pages. But if the meta description you add here is very good, you’ll increase the odds.
SEO Analysis
The next step is optimizing your content for your focus keyphrase to rank in the search engines. You can enter your keyphrase at the top of the sidebar in the block editor, or at the top of the ‘SEO’ tab.
Just so we’re clear: entering a keyphrase here doesn‘t guarantee that you’ll rank for that keyphrase. Unfortunately, we can’t make that happen for you. What we can do, is evaluate how well your content is optimized to rank for that specific keyphrase. Need more information on picking a focus keyphrase? Find out how to choose the perfect focus keyword.
Our SEO analysis currently includes the following checks:
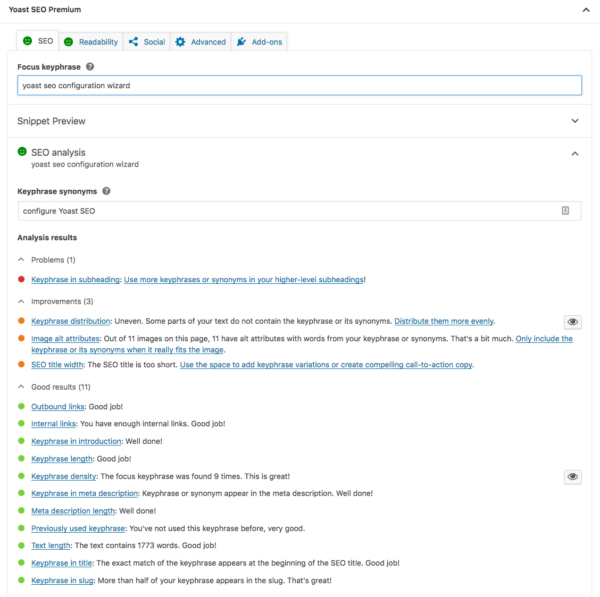
In the image, you can see how we analyze different aspects of your text:
- Keyphrase in subheading: subheadings are a prominent part of your article. Add your focus keyphrase to a few of your subheadings, so its importance is clear.
- Keyphrase distribution: you need to mention your keyphrase often enough in your text, but good balance is key. That’s why we check if your keyphrase is evenly distributed throughout your text.
- Image alt attributes: add images to create a better experience for your users. Use the focus keyword in the ALT text so that Google can relate that image to the keyword.
- SEO title width: a short page title allows you to add a trigger for a visitor from Google to click to your website.
- Outbound links: we encourage sites to link to other websites as well, as this opens up the web. Link to other websites that back up the points in your blog posts, or provide further information. This will help Google work out which websites relate to each other on what subjects.
- Internal links: to set up a proper site structure, link to at least one other related page on your site. It keeps visitors on your site and shows them more (background) information.
- Keyphrase in introduction: you want to make clear right from the start what the page is about, so try to add the focus keyphrase from the start.
- Keyphrase length: If a keyword is too short, you’re probably targeting a super competitive keyword, whereas longer keyphrases make it harder to optimize your post. So, we recommend a maximum of four relevant keywords for your focus keyphrase.
- Keyphrase density: In the free version of Yoast SEO, you’ll get a green bullet if your keyphrase density lies between 0.5 and 3%. That’s to make sure you use your keyphrase enough, without over-optimizing.
- Keyphrase in meta description: add a meta description that includes the focus keyword. People searching for that term on Google may see this in search results, so make it enticing to click on.
- Meta description length: We advise to keep your meta description between 120 characters and 156 characters.
- Previously used keyphrase: you should optimize a page for a certain keyword – not an entire website. So don’t create pages that compete with each other! Yoast SEO will warn you if you write more than one post about the same keyword. A simple solution is to use a variation or a long tail keyword
- Text lenght: if you want your page to rank for a specific keyword, you need to write at least 300 words on the subject. Otherwise, search engines will have a hard time grasping your topic, and might even consider your page ‘thin content‘ – and you want to avoid that.
- Keyphrase in title: if you add your focus keyword at the beginning of your page title, it will have the most value. Also, it will immediately stand out when your post is shared
- Keyphrase in slug: repeat your focus keyword in your URL. This makes it clear – even out of context – what your page is about. And Google also likes seeing it in there.
For an overview of all checks in the Yoast plugin, check out the Yoast SEO assessment page.
If you have Yoast SEO Premium, the plugin will recognize word forms, and allows you to optimize for keyword synonyms as well. Our premium analysis is as smart as Google, why not give it a spin?
Does every light need to be green?
No, not every bullet in the SEO analysis has to be green for your post or page to rank. Similarly, getting your post ‘all-green’ in no way guarantees that it will rank. While it’s tempting to simply aim for all-green bullets on every post or page without working on other aspects of your SEO, that isn’t the best SEO strategy. Proper keyword research and site structure always come before getting green bullets. Read more about properly using the colored bullet system in Yoast SEO.
Next level: Cornerstone content
If your page is the main page for a particular topic or keyword in a group of pages you plan to write, you can mark it as cornerstone content. There’s a toggle for that in the Yoast SEO metabox, so Yoast SEO can help you you create your best cornerstone articles. But, how to implement a cornerstone content strategy on your site isn’t a subject for a beginner’s guide to Yoast SEO! It might be wise to take our Site structure course first :)
A bit more advanced: Yoast Dashboard
Of course, there is so much more you can do with Yoast SEO. You can access and change many settings of the plugin in the Yoast Dashboard. There’s usually no need to change anything. Especially if you’re an inexperienced user, it’s wise to stick to the settings you set in the configuration wizard. But let’s have a quick look around to give you an idea of what the options are.
Search Appearance
If you go to Yoast > Search Appearance, you can adjust how your site appears in search engines. Take the ‘Title Separator’, for instance. In the configuration wizard, you can choose whether you want a dash, asterisk, or something else. But, if you change your mind later, you can always change it here.
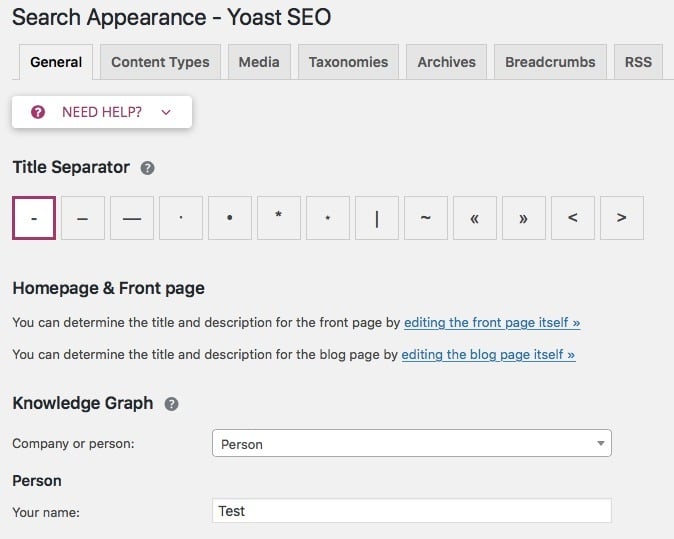
In ‘Search Appearance’, you can change, among other things, how our plugin sets up your titles and metas. Go to the tab ‘Content Types’, where you will find the default template we use for your post titles. It’s good to know it’s there and realize what you can configure.
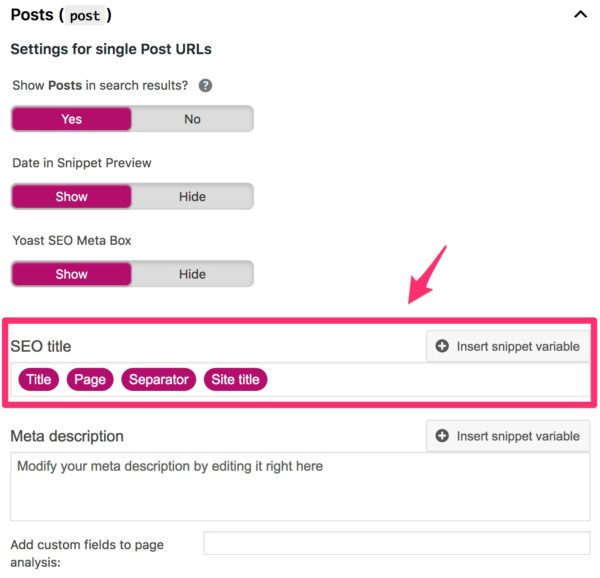
This simply means we will use the title of your page or post as the page title, and add the page number if your post is divided over multiple pages. Then we add a title separator (which we discussed in the first paragraph on this section) and then the site name you have set when creating your site. So, following this setup, the title for this Beginner’s guide to Yoast SEO post looks like this:

Note that this example doesn’t include a page number after the page title, as this post is just one page.
This is the setup we recommend. It’s focused on the page title (“Beginner’s guide to Yoast SEO”) and has proper branding at the end (“Yoast”).
The reason why I’ve drawn your attention to this setting, is that you should know it’s there, so you don’t have to look for it in the future. This is why your titles are shown like this in Google searches.
Keep reading: Snippet variables in Yoast SEO »
Yoast SEO for beginners
That’s it for our beginner’s guide to Yoast SEO. With Yoast SEO properly installed, your website is ready for Google. You now can get on track adding and optimizing your content with the Yoast readability analysis and SEO analysis!
Here’s a few more reading recommendations, if you really want to become a pro user of the Yoast SEO plugin:
- How to use the Yoast SEO readability analysis tool
- How to use the Yoast SEO content analysis tool
- How to use Yoast SEO to write an awesome meta description
- Why and how to use the Yoast SEO text link counter
- Snippet variables in Yoast SEO
- Why you should use a focus keyphrase only once
- Yoast SEO: don’t set it and forget it!
If you want all this information and more, neatly structured in one place, and with helpful videos, check out our Yoast SEO for WordPress plugin training, it’s free!
Read on: Why every website needs Yoast SEO »
The post The beginner’s guide to Yoast SEO appeared first on Yoast.
from Yoast • SEO for everyone https://ift.tt/2y4jGfS

No comments:
Post a Comment